
High-End Stainless Steel Decorative Trims: A Complete Engineering Guide
Table of Contents
In modern high-end interior design, “luxury” has shifted from a simple accumulation of materials to an extreme pursuit of detail and the aesthetics of finishes. As a key element that connects different materials and breaks the monotony of large-scale surfaces, stainless steel decorative trims are becoming an indispensable artistic medium in contemporary bespoke projects.
However, behind what appears to be a simple metal strip lies a series of systematic processes—from sheet material selection, V-grooving, and PVD coating to nail-free on-site installation. How can the ruggedness of metal be perfectly harmonized with the warmth of marble? How can the luster be maintained as if brand-new for decades in export markets and high-humidity environments? Combining international quality control standards (such as the JYF METAL Professional Metal Structural Components Process Specifications), this article will provide an in-depth analysis of the “hidden aesthetics” and implementation standards of stainless steel tile trims.
Analysis of Common Cross-Section Shapes and Functions
Depending on the application area and visual requirements, stainless steel trim strip is primarily fabricated into the following core geometric shapes:
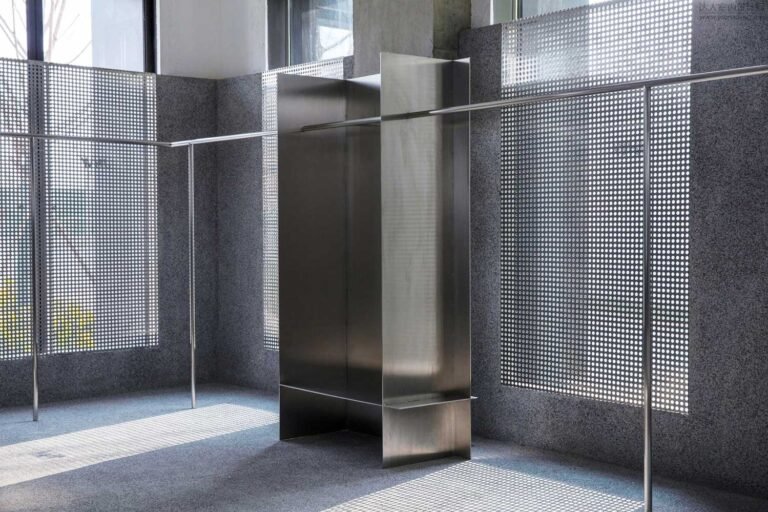
T-Profiles: The undisputed star of decorative joint treatment. Often used to accentuate gaps between wood paneling, marble, or feature walls, the ultra-thin 5mm T-profile creates an exceptionally refined “invisible” metal joint.
U-Channels: A powerful tool for creating recessed light and shadow effects. Their inward-curving structure creates deep “shadow lines” on walls, producing a strong sense of depth, and they are often used as carriers for LED light strips.
L-Angles(Corner Guard): Protecting outside corners and providing visual closure. They wrap around the protruding corners where tiles or stone meet, preventing edge damage while outlining a sleek metal silhouette.
Skirting Baseboards and R-Curved Profiles: Boundary Connections and Edging. Stainless steel baseboards provide protection and create a floating effect, while R-curved profiles are used for inside corner transitions or furniture edging, offering a softer visual appearance.
The Essence of Aesthetics: Sophisticated Surface Finishes and Color Techniques
The “upscale look” of stainless steel trim is achieved entirely through meticulous surface modification and pvd coating processes:
Texturing Techniques
- Hairline / Satin: Features a delicate, thread-like texture with a subtle, understated matte finish. It resists fingerprints and has a smooth, warm feel, making it the most commonly used technique in haute couture design.
- Mirror Finish (8K Mirror): With clear reflections that visually expand a space, this finish is often used to accent ceilings or dimly lit corridors.
- Embossed/Etched: Featuring unique, dynamic light-and-shadow patterns, this has become a favorite in minimalist and mid-century modern designs in recent years.
Color Finishing
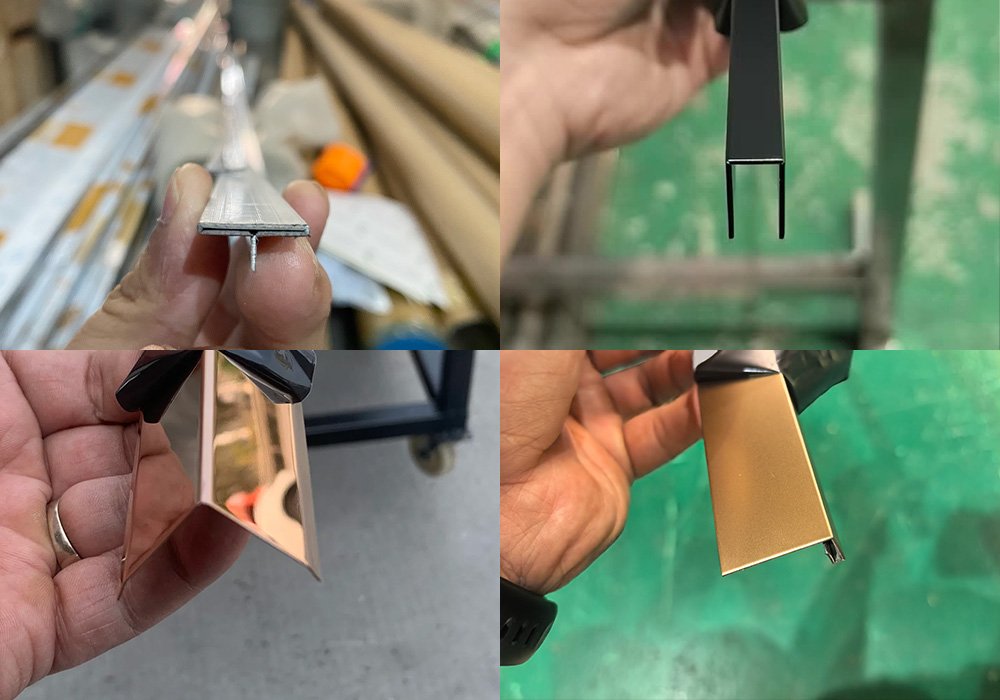
A nanoscale ceramic coating is deposited in a high-vacuum environment without obscuring the original brushed or mirror finish. Mainstream haute couture colors include Champagne Gold (Italian-inspired light luxury), Black Titanium Gold (modern minimalism), and Antique Bronze (new Chinese-style distressed finish).
Core Machining: Precision V-Grooving
The difference between an ordinary stainless steel trim and a high-end custom trim often lies in the sharpness of the corners. High-standard processing (such as following the JYF METAL process specifications) involves rigorously screening SUS304 grade-A material at the source, and requires a CNC V-groove cutting process to be performed before bending.
| Process Comparison Items | Standard Bending Process (Without Grooving) | High-End CNC Slotting and Bending Process (V-Groove) |
|---|---|---|
| External Visual Appearance | Features pronounced rounded corners (R corners), resulting in lines that lack sharpness | Perfect 90° angles, straight and upright, with a distinctly modern geometric aesthetic |
| Fit of Panel Seams | Gaps appear at the edges when joined with marble or tile | Fits the substrate with micro-seams or even a “seamless” finish, resulting in an exceptionally clean edge |
| Difficulty of Corner Joints | Misalignment and height differences are common during 45° diagonal joints | Tight corner joints; after sanding, the joints are virtually invisible |
| Suitable Applications | Standard industrial products, mid- to low-end commercial projects | Used in high-end villas, five-star hotels, and bespoke furniture trim |
A Perfect Fit: Three Golden Rules for On-Site Construction and Avoiding Pitfalls
Perfect craftsmanship ultimately depends on high-standard on-site installation. The following are the core specifications for nail-free installation commonly adopted in the industry:
Flush-Mount Installation Procedure (T / U-Shaped Strips)
This method is suitable for decorative grouting between marble, tile, wood paneling, or accent walls. The overall effect is smooth and even, with the trim lying almost flush with the surface.
01
Cut the groove
Cut a groove in the wood paneling or stone slightly wider and deeper than the stainless steel trim.
→
02
Apply adhesive
Clean dust from the groove and apply nail-free adhesive or structural adhesive inside the groove.
→
03
Insert and secure
Align the trim with the groove and snap it into place. Use a rubber mallet wrapped in soft cloth if too tight.
→
04
Clean and protect
Peel off the protective film after all hard finishes are complete and wipe away any excess adhesive.
Snap-on/Base Mounting (Most commonly used for baseboards and high-end trim)
To prevent adhesive from aging and peeling off, or to facilitate future disassembly and wiring, high-end projects often use a “detachable base” snap-on installation method.
01
Secure the base
First, attach the specialized aluminum alloy, wooden, or plastic base to the wall or substrate using expansion screws or nail guns, ensuring it is level.
→
02
Snap in the trim
Align the grooves on the stainless steel trim with the base and press firmly until you hear a “click,” indicating it is securely locked in place.
Direct Adhesive Installation (Most Commonly Used for L-Shaped Corner Trim and Flat Trim)
This method is commonly used for protecting outside corners (L-shaped) or for retrofitting onto finished walls.
01
Prepare the surface
Ensure the installation area is flat, dry, dust-free, and free of grease.
→
02
Tape + nail-free adhesive
Apply nail-free adhesive to the back and attach heavy-duty double-sided tape along the gaps as a temporary hold while adhesive cures.
→
03
Press firmly
Attach the strip to the wall and press firmly for several minutes to ensure it adheres completely.
Key Details to Avoid Pitfalls When Installing Floor-Mounted Fixtures
Be sure to use “nail-free adhesive” or “neutral silicone sealant”: Never use acidic silicone sealant, as it can corrode the PVD coating on the stainless steel surface or cause a chemical reaction, leading to blackening or staining of the surface over time.
Corner Joining (45° Angle): When two trim strips meet at a corner, use a cutting machine to precisely cut a 45° angle before joining them. Do not remove the protective film before cutting; otherwise, the high-speed rotating blade may scratch the mirror finish or brushed texture.
Ensure the Substrate Is Level: Stainless steel trim has virtually no flexibility. If the wall or wood substrate is uneven, the trim will form noticeable gaps or bend after installation, severely compromising the high-end, bespoke finish.
Going Global: Packaging Standards for Foreign Trade Projects
With the surge in exports of high-end custom metal profiles, the rough conditions of international sea transport—including high temperatures and high salt fog—pose severe challenges to product protection. To ensure that every profile arrives flawless on the other side of the ocean, protective packaging must be implemented in accordance with JYF METAL’s cross-border logistics standards.
The surfaces of the profiles are coated with 8C-10C UV-resistant, high-temperature-resistant film; individual bundles are wrapped separately in cardboard boxes; and the outer packaging consists of fully enclosed, reinforced, heavy-duty wooden crates, fitted with internal impact-resistant panels and filled with an adequate amount of industrial desiccant, before being securely fastened with steel straps. This end-to-end quality control loop serves as the ultimate safeguard for delivering bespoke aesthetics across borders.


Conclusion
Although stainless steel decorative profiles play a supporting role in fixed installations, their elegant PVD finishes and clean, straight-angled grooved edges have made them an indispensable visual focal point in spatial design. Only by mastering their material properties, advanced processing standards, and rigorous installation specifications can the metal’s rugged strength radiate a timeless, luxurious charm on architectural facades.